Your point of sale has many great features to cover. Please read the content below for a step-by-step guide on navigating your point of sale.
(There is also a PDF version of this guide attached to this page for your convenience.)
This tutorial picks up where the last tutorial (Step 4.1 – Setting up your Point of Sale) left off.
This guide will teach you the very basics of navigating your point of sale. If you seek a tutorial on a more specific process, please reference our Online Knowledge Base and its growing library of tutorials for assistance.
This tutorial is best understood by following along on your point of sale.
Logging In
The first screen you will be greeted with every time you boot up your point of sale for the day is the log-in screen.
You have two combinations of login information that you can use:
- Username and Password: If you have access to the mobile scanner and the portal, you can use the same username and password to sign into the Point of Sale.
- User ID/Employee ID and Pin: It is suggested that you provide this combination to your cashiers. In general, this is the option we would suggest everyone uses for the point of sale.
NOTE: You can only use the login information in these specific combinations. For instance, you cannot input your username and then use your pin to login.
Opening a Batch
After you login, you will be on the “Open Batch” screen, where you will input the starting till amount. Here, you can open the till to count starting till monies. Use the till calculator to make quick work of counting it all.
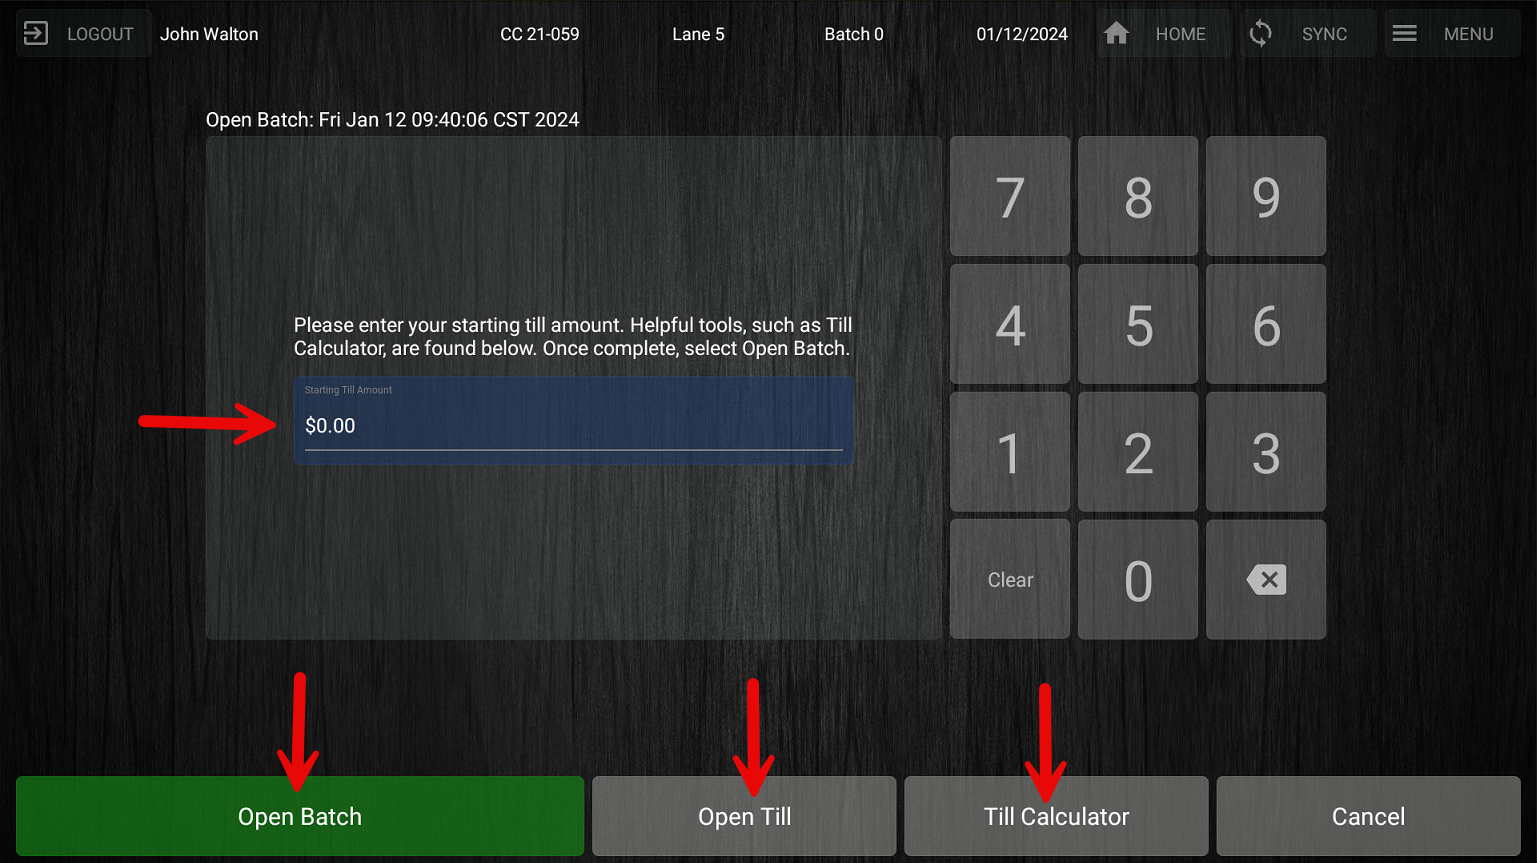
When using the “Till Calculator”, you can input the quantity of bills and coins you have, and the calculator will process it for you. If you have 7 $20 bills in your till, you can simply put in “7” in the “Enter $20 Count” section, rather than adding up the amounts as you count.
Once you have your total amount calculated, you can press “OK” and the total will be automatically pulled over to the “Open Batch” screen. You can also press “OK and Print” which will print a summary of what was calculated and take you back to the “Open Batch” screen with the total filled in.
Once you are finished calculating your starting till amount, press “Open Batch”.
Best Practice
It is suggested that you open your batch in the morning when you open, run your transactions for the day, and then close your batch at the end of the day when you are closing for the night.
This helps when keeping track of the amount of money that is in your till, what you started with that day, and what you ended with, as well as the day-to-day transactions that make up the change from open to close.
Every morning, you should be greeted by the Open Batch screen if you follow this process.
The Main Sales Screen
This is the main screen you will be using to carry out transactions. First, let’s take a look at the different features available to you on this screen.
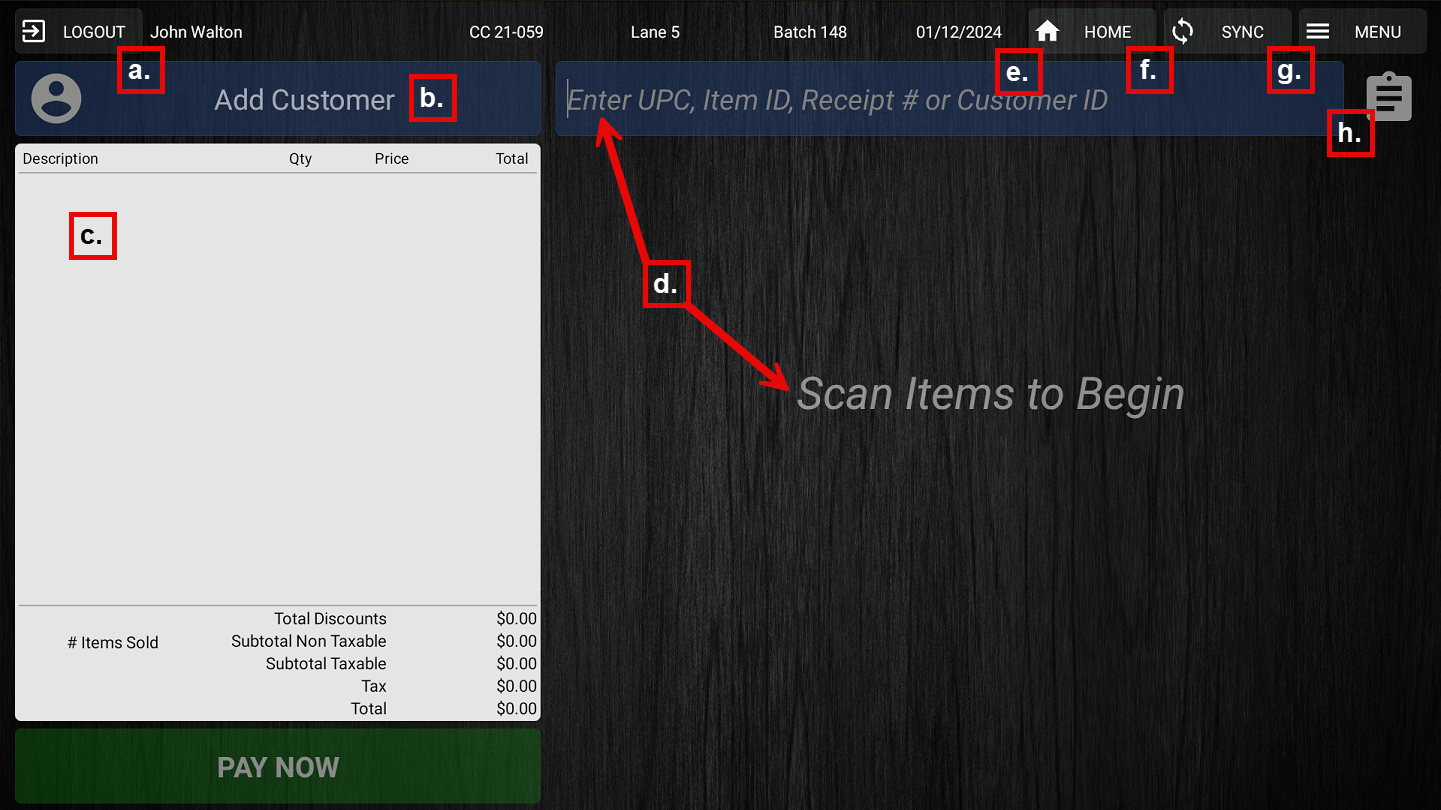
- Logout – Will log you out and take you back to the login screen.
- Add Customer (to Transaction) – Will take you Customer Search screen to add them to the transaction. You can also add new customer records here.
- Item entries for current transaction – All items that have been scanned/entered will appear here.
- Scan Items/Enter UPC/Item ID – You can either scan items or enter them manually here.
- Home – Will take you to the home screen. (*Not commonly used)
- Sync – Will take you to the sync screen. (*Not commonly used)
- Menu – More advanced options will be found here for other processes.
- Quick List/Lookup List – Will take you to the quick items list, or you can search items up from your entire inventory items list to add to the transaction.
Home Screen
The home page is typically not used for store practices. If you find yourself on the Home screen, press the point of sale button in the center to go back to the main sales screen.
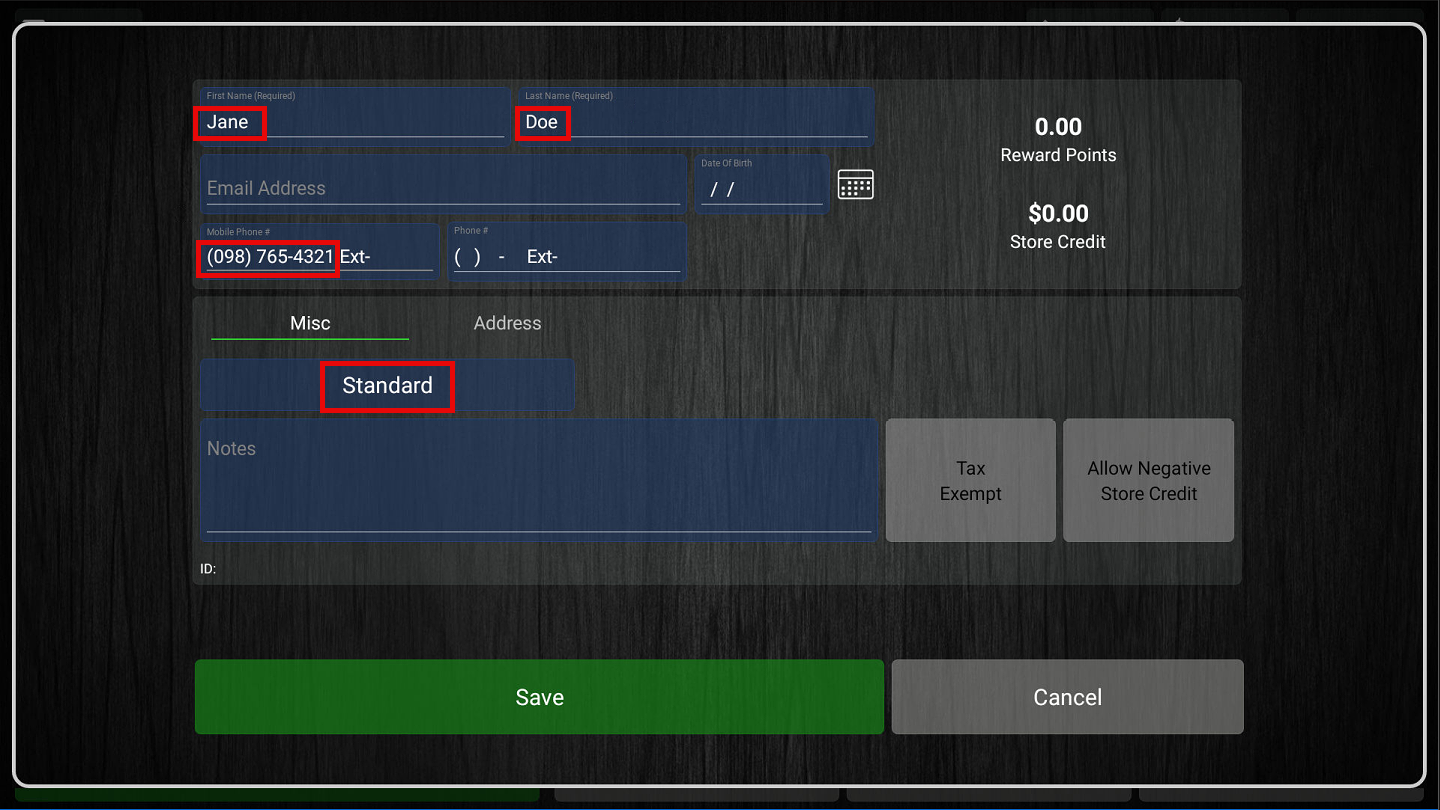
Add Customer Screen
This screen allows you to add an existing customer to your current transaction or add a new customer record that will then be added to the transaction.
For existing customer records, you can use the filters at the top to filter by first name, last name, phone number, or email. Press “Search” to see the results under your filters. You can also press “Search” without any fields filled out to view your entire customer record list.
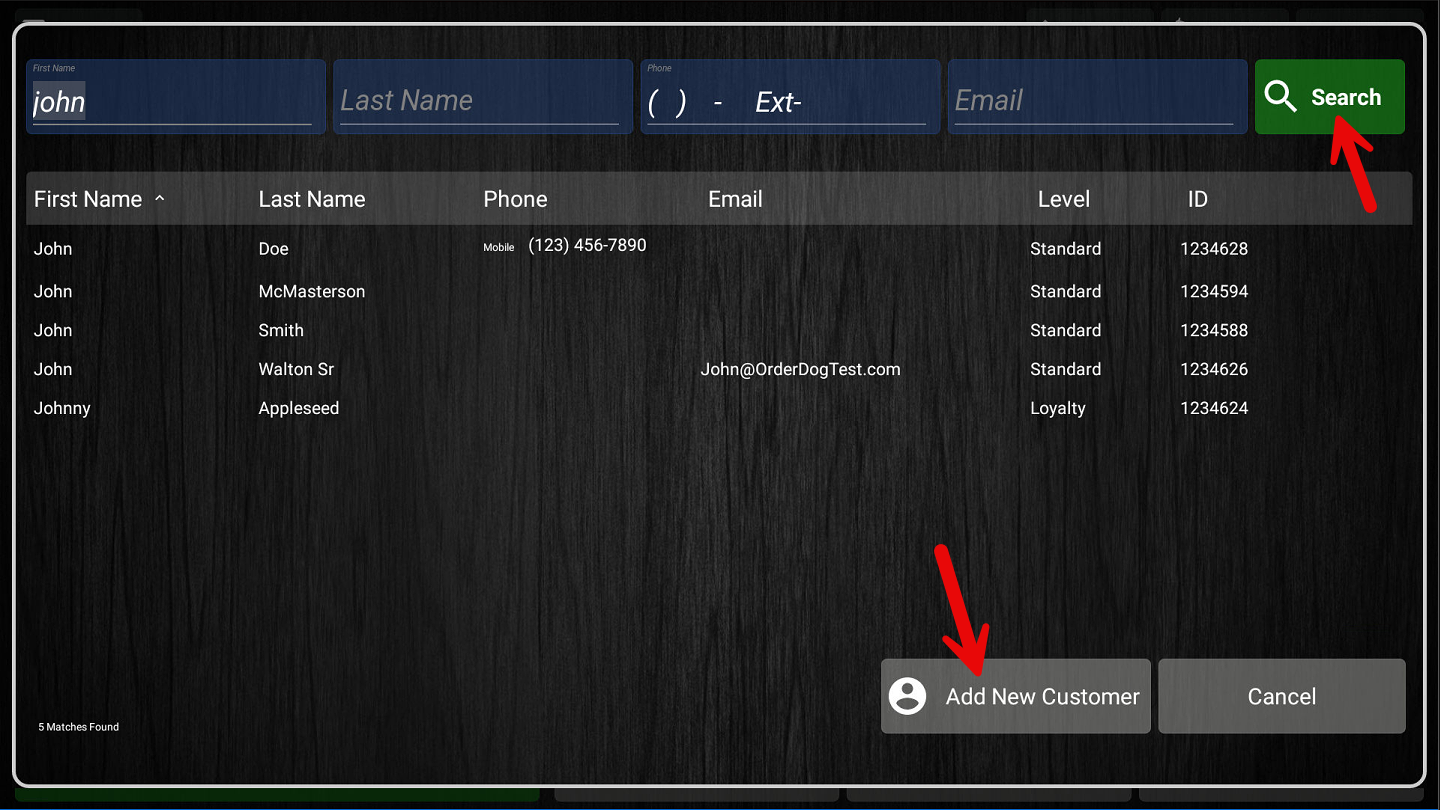
For new customer records, press the “Add New Customer” button and fill out the following fields to ensure the best customer experience:
- First Name (Required)
- Last Name (Required)
- Phone Number – Fill this out and you can have customers input their phone number on the customer facing display to bring up their customer record the next time they shop with you.
- Customer Group – Select the customer group they fall under, i.e. Standard, Employee, Loyalty, Senior, etc. This will apply the discounts associated with this customer group automatically to transactions with this selected customer. The default customer group is Standard. Select Standard if the customer does not fall into a special group.
- Press “Save” to make the new customer record and have them automatically added to the current transaction.
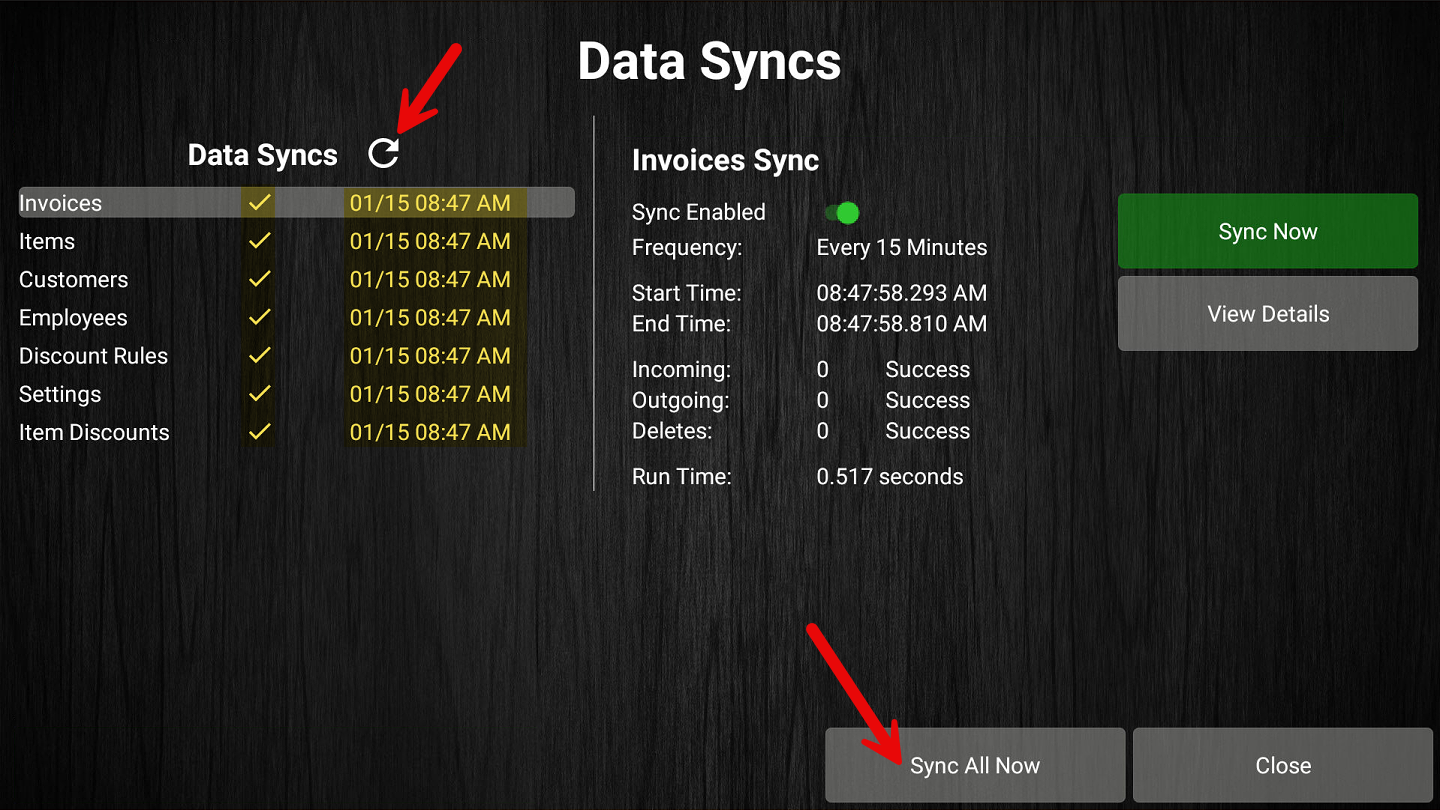
Sync Screen
The syncs are set up to automatically update. If you want to bring down recently changed data to your Point of Sale faster, press the “Sync All Now” button. Then, press the cycling arrow next to “Data Syncs” to make sure that the sync went through properly. Syncs are successful when every section has a checkmark next to it and the time stamp is most recent to your last manual sync, or the last automatic sync.
Quick List/Lookup Screen
You can set certain items up to appear on the quick list for easy access, and you can do so on the portal or the mobile scanner. You can also press the “Display All” button to see a list of all of your items from your Inventory Items List.
For both the quick list and the display all options, you can use the fields at the top to filter through your items until you find the one you are looking for. Simply tap the item you want to add to the transaction.

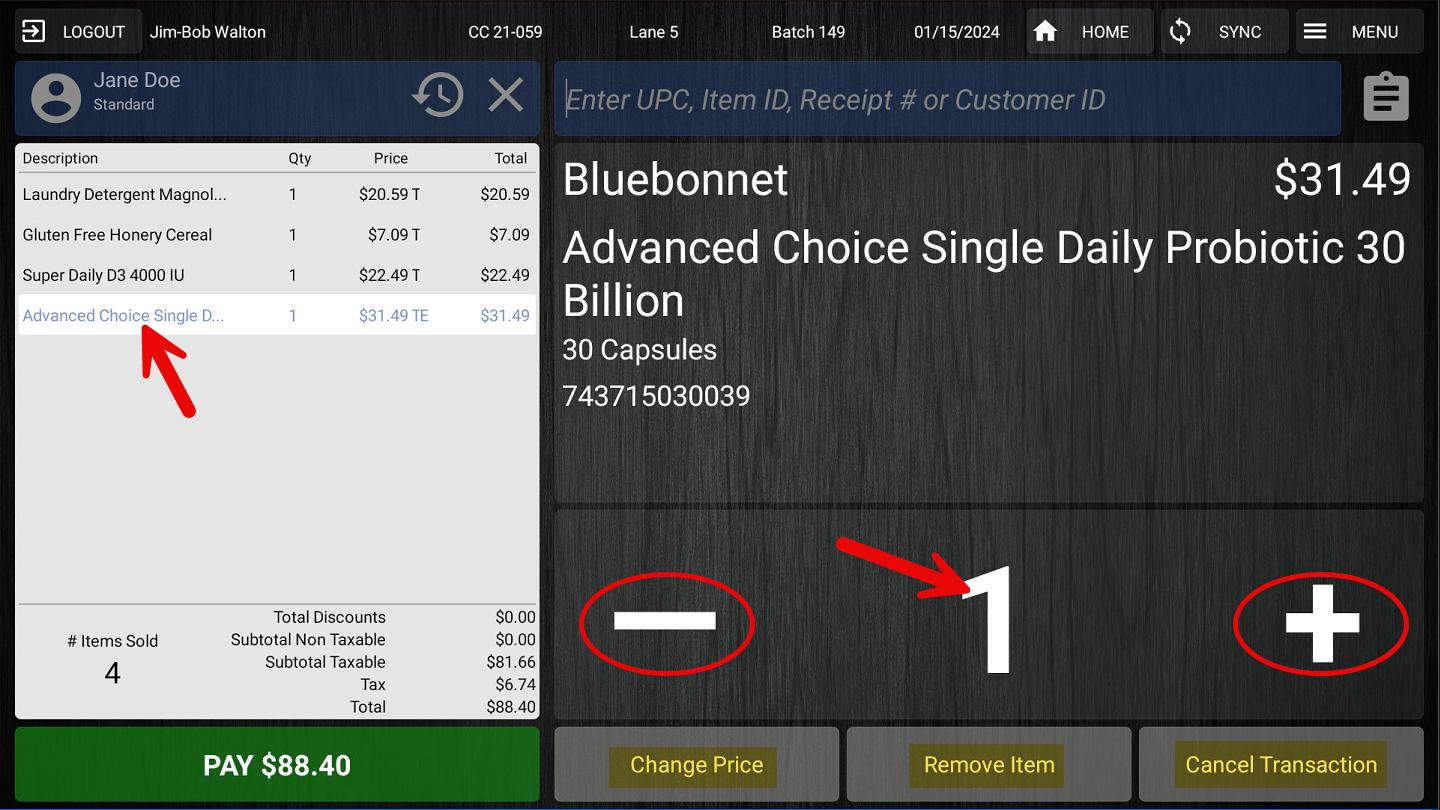
Scanning and Editing an Item
Go ahead and scan in a couple of items or enter them manually. Your list of items that are scanned for the current transaction will appear on the left, while a specific item will be focused on the right. The last item you scanned will be focused on, but you can tap any of the items to focus on them.
There are a couple of different things you can do with focused items:
- Edit the quantity of the focused item by tapping the “-“ and “+” buttons, or tapping on the number and typing on your keyboard.
- Press the “Change Price” option to input a manual discount amount, change whether it’s EBT Eligible, or has the sales tax on it.
- Press the “Remove Item” button to remove the highlighted item from the transaction.
- To cancel the transaction entirely, simply tap the “Cancel Transaction" button.
-
We will go over more specifics on how to complete transactions in a different user guide. For now, press the “PAY” button to move on to the payment screen.
Select Tender Type Screen
- Customer Balance – view the customer’s Store Credit and Reward Points balance
- Balance Due – the total balance due. The balance will update as split payments are made.
- EBT Eligible – the total amount out of the balance due that is EBT eligible will be displayed here when applicable.
- Tender Types – The customer has the option of paying toward their balance in each of these ways:
- Credit Card
- Debit Card
- Cash
- Check
- EBT Card
- Store Credit
- Coupon
- Gift Card
- Bottle Deposit
- Reward Points
Payment types not eligible for this transaction will be disabled. For example, this customer does not have store credit or reward points yet, so these options are unavailable to them for payment.
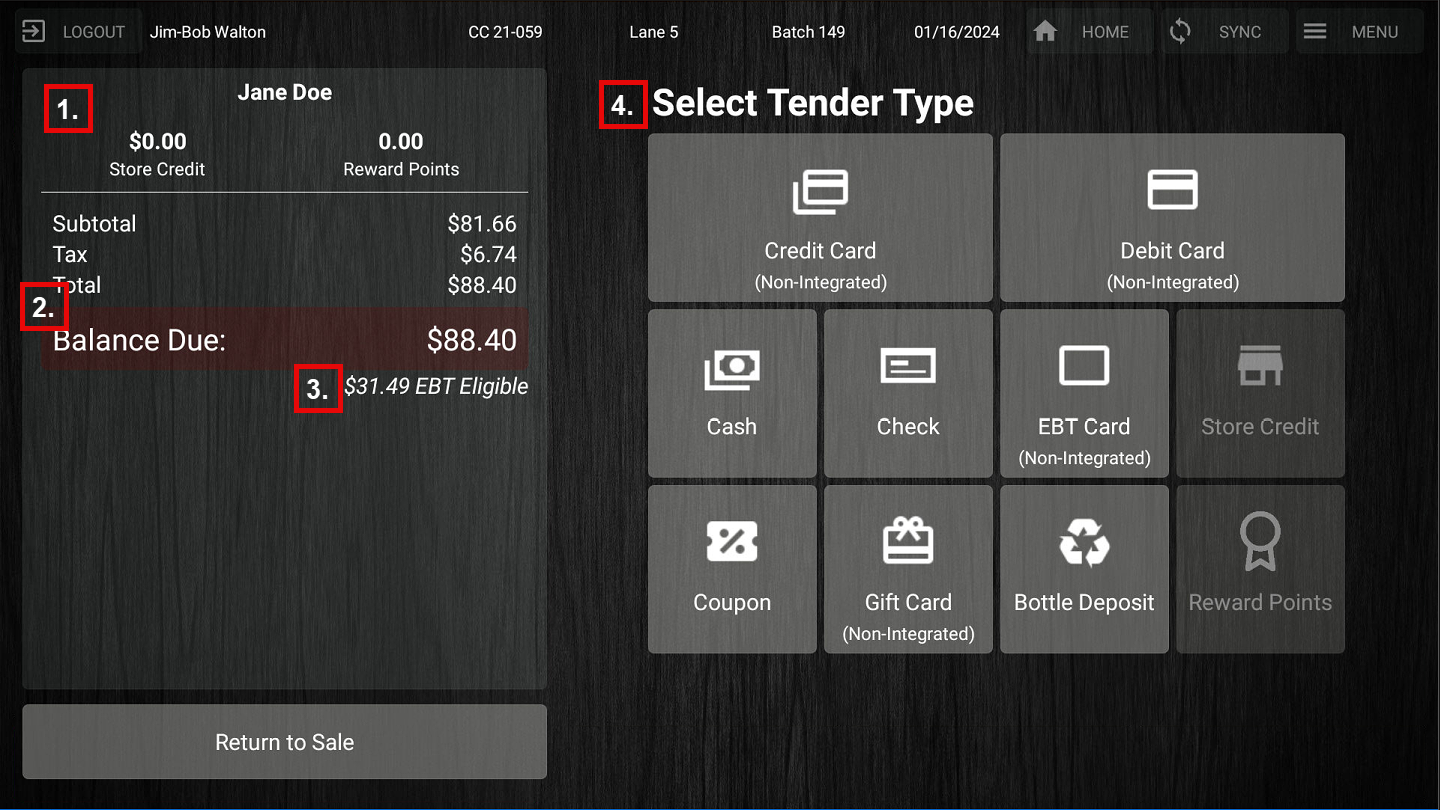
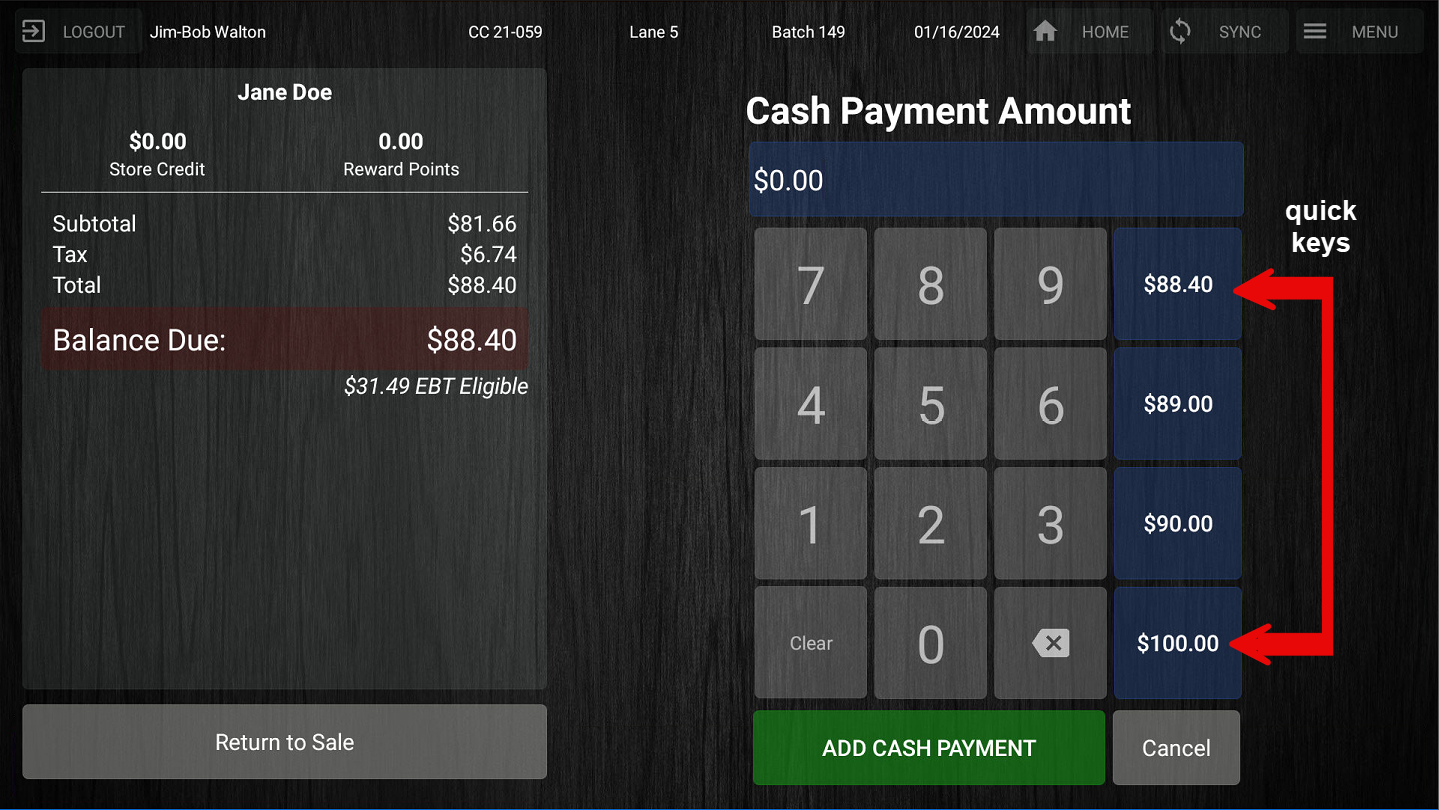
Clicking on a tender type will pull up the payment amount screen, where you can manually input the amount that will be paid with this payment option or use one of the quick keys on the right of the number pad. Quick keys will display amounts available on specific tender types, such as Store Credit or EBT that might be less than the full amount due.
Customers can pay for the entire balance using a single tender type or pay for parts of it at a time using a combination of tender types, until the balance is fully paid.
Receipt Screen
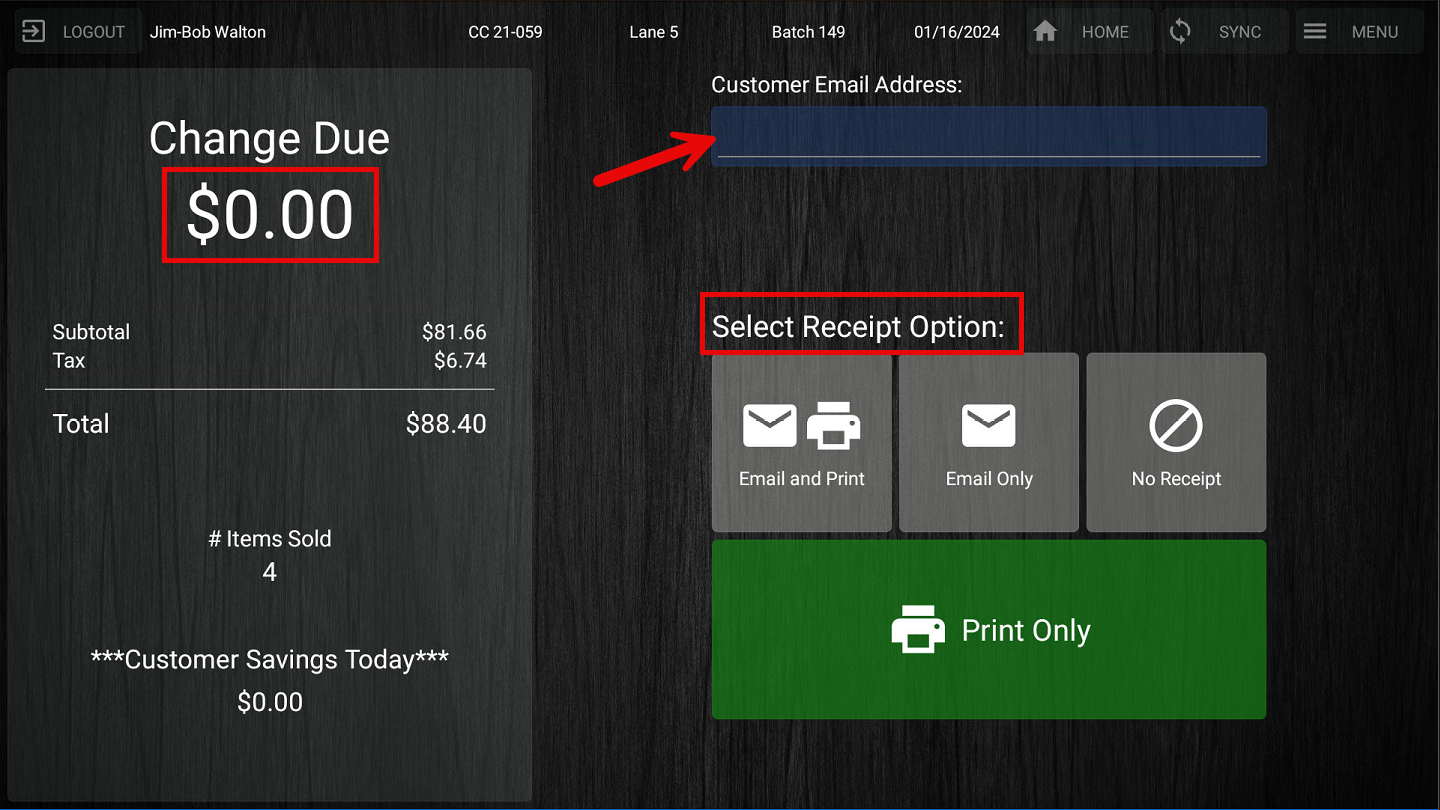
Once the balance is fully paid, you will be taken to the receipt screen. First, if change is owed to the customer, you can see how much needs to be given to them on the left side.
For receipts, you have the option to:
- Email and Print
- Email Only
- No Receipt
- Print Only (Most commonly used)
If this transaction has a customer associated with it that has an email address on file, their email will automatically appear under “Customer Email Address”. Otherwise, you can use that same field to manually input their email address.
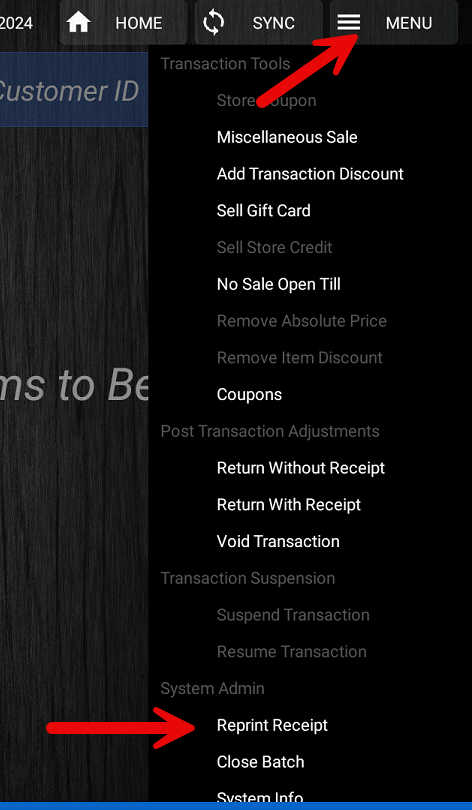
NOTE: No matter the option you choose, you will always be able to access a record of the receipt for your transactions, even if no receipt is printed. Simply, go to the Menu and select Reprint Receipt or if you have already closed your batch, it is available on the portal at any time.
Once you have selected a receipt type, you will be taken back to the main sales screen, ready to take care of the next customer.
Closing a Batch
The last thing we’ll go over in this navigation guide is how to close your batch for the day. Please recall that we suggest you open your batch at the beginning of the day and close the batch at the end of the day.
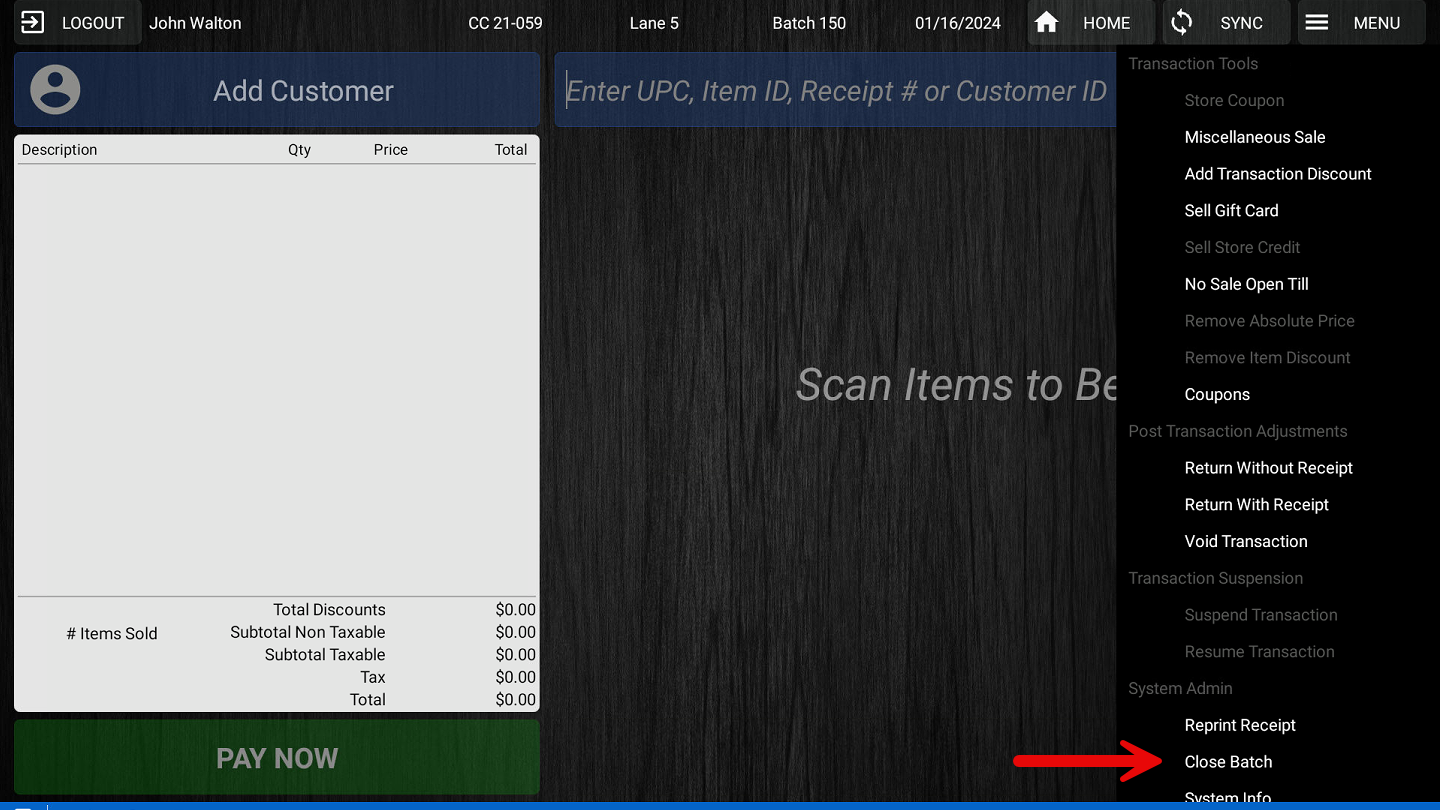
On the main sales screen, press the “Menu” button in the upper right corner. Under “System Admin”, press the “Close Batch” option.

When closing your batch, you’ll first want to enter the total cash and checks you ended the day within their corresponding fields. Use the till calculator as an easy way to count the cash in your till.
Next, be sure to review the details of the day to ensure everything looks
The most informative fields to look at are the “Net Taken In” and “Difference” fields. If your ending cash/check amount in your till is different from what the Point of Sale has calculated, it will tell you the difference that is potentially unaccounted for. Be sure to doublecheck the amounts you have input to ensure the most accurate batch report.
When everything looks good, click “Close Batch,” where you will be asked to confirm if you would like to close your batch. If your closing till amount differs from what the Point of Sale calculated should be in your till, you can press “Cancel” to doublecheck your amounts. Otherwise, press “Close Batch”, and you’ll be taken back to the login screen.

YOU'RE DONE!
Now onto the next step!
Please click one of the following links for a guide on how to set up your specific scale:
There is also a PDF version of this guide attached to this page for your convenience.
McKennan Jones
Comments